Skip to content
How to Address Dry Rot in Your Crawl Space
Dry rot is serious and can wreak havoc on your home’s foundation and structural integrity. If you’ve discovered signs of dry rot in your crawl space, don’t panic—there are effective ways to remediate the problem and prevent it from returning. In this guide, we will walk you through dry rot, its key signs, and the steps to address it, from assessment to prevention.
What is Dry Rot?
Dry rot is a fungus that decays wood. It thrives in damp, poorly ventilated areas. Despite its name, dry rot starts in moist conditions but can spread to relatively dry lumber, making it a silent yet destructive force.
7 Key Signs of Dry Rot
Discolored or Brittle Wood
Wood affected by dry rot often appears darker or brittle and may crumble under pressure.
Fungal Growth
Look for white, gray, or yellowish fungal patches. Advanced dry rot can produce fruiting bodies resembling mushrooms.
Persistent Musty Odor
A damp, earthy smell may accompany dry rot. If you notice this smell in your crawl space, fungal growth may be at play.
Shrinking or Warping Wood
Dry rot often causes wood to shrink or warp, impacting its structural integrity.
Peeling or Cracked Paint
Due to trapped moisture, dry rot may cause bubbling or peeling on painted wood.
Cuboidal Cracking
Advanced dry rot often causes wood to crack into cube-like sections.
Soft Spots in Wood
Wood that feels soft or spongy when pressed is likely compromised.
Why It’s Crucial to Spot Dry Rot Early
Unaddressed dry rot can spread quickly, weakening the structural supports in your crawl space and potentially causing damage throughout your home. The earlier you detect dry rot, the better. Early detection can significantly minimize repair costs while maintaining a safe living environment.
Next Steps: Addressing Dry Rot
If you’ve spotted any of these signs, it’s time to take action. In the next section, we’ll explain how to address dry rot and prevent it from returning.
Your Crawl Space Guys are experts in identifying and solving crawl space issues. Contact us today for a professional inspection and tailored solutions to keep your home safe!
Step 1: Assess the Damage
Before diving into repairs, it’s crucial to assess the extent of the damage caused by dry rot. A thorough crawl space inspection can help determine the severity of the issue and inform you of the necessary steps for remediation.
Start by carefully examining all wooden structures, including joists, beams, and subflooring. Use a flashlight for discoloration, cuboidal cracking, or visible fungal growth. Test suspicious areas by pressing a screwdriver into the wood. If it crumbles or feels soft, dry rot has likely compromised it.
If there is extensive damage or critical structural components are affected, it’s best to call in a professional contractor like Your Crawl Space Guys. Structural engineers can assess the situation comprehensively and ensure your home’s safety during repairs. Even if you plan to handle some of the work yourself, professional input can provide clarity and confidence in your approach.
Step 2: Eliminate the Source of Moisture
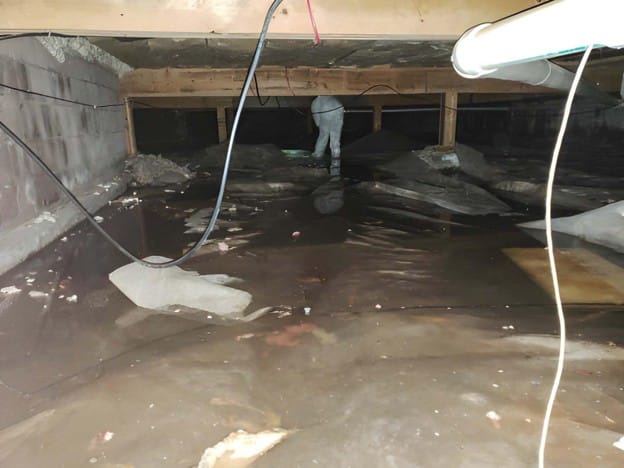
Dry rot thrives in damp conditions, so removing the moisture source is the cornerstone of any successful remediation plan. Moisture can come from many sources, including plumbing leaks, poor drainage, or condensation in your crawl space.
Begin by fixing any visible leaks. Inspect plumbing lines and drainage systems for cracks, drips, or damage that might allow water to accumulate. If your crawl space experiences flooding or pooling water, address the drainage around your home. Grading the landscape to direct water away from the foundation can significantly reduce moisture intrusion.
Another critical step is installing a vapor barrier. A heavy-duty plastic sheet placed over the soil in your crawl space can block ground moisture and create a drier environment. In some cases, you may also need to insulate the crawl space walls to further control temperature and humidity levels.
Step 3: Improve Ventilation
Even after addressing moisture sources, poor ventilation can create a humid environment that encourages the recurrence of dry rot. Ensuring adequate airflow in your crawl space is vital for long-term prevention.
Start by checking the existing ventilation system. If your crawl space has vents, ensure they’re unobstructed and functioning correctly. For added protection, consider installing vent fans to promote consistent airflow. Dehumidifiers are another excellent option, especially in areas with high ambient humidity. Keeping the relative humidity below 60% can significantly reduce the likelihood of fungal growth.
Proper ventilation addresses current dry rot issues and prevents future problems. Pair this step with regular inspections to ensure your crawl space remains dry and well-ventilated year-round.
Step 4: Remove and Replace Damaged Wood
Removal and replacement are unavoidable in cases where the wood is significantly compromised. Damaged wood that has lost its structural integrity can pose safety risks. At this point, replacing the wood is crucial to restore the stability of your home.
Begin by carefully removing the affected sections of wood. Use a saw or other tools to cut out the compromised areas, ensuring you don’t disturb nearby unaffected wood. Dispose of the damaged wood properly to prevent fungal spores from spreading.
When replacing the wood, opt for pressure-treated lumber. Treated wood is resistant to fungal decay and is a better long-term solution for crawl space environments. Ensure all new wood is securely installed and appropriately sealed to prevent future moisture infiltration.
If the damage is extensive or impacts load-bearing elements, consult a professional contractor or structural engineer to ensure repairs meet safety standards.
Step 5: Treat Remaining Wood
If the dry rot damage is isolated or caught early, treating the affected wood with a fungicide can halt the spread of the fungus and protect surrounding materials. Try a specialized fungicide, which can kill fungal spores and inhibit their growth.
Before applying the fungicide, clean the area thoroughly. Use a wire brush to help remove any loose or crumbling material, then vacuum the surface to eliminate dust and debris. A clean area ensures the fungicide penetrates deeply into the wood and provides maximum protection.
Apply the fungicide, following the manufacturer’s instructions and covering all exposed wood surfaces. The treatment should dry completely before proceeding with additional repairs or reinforcements.
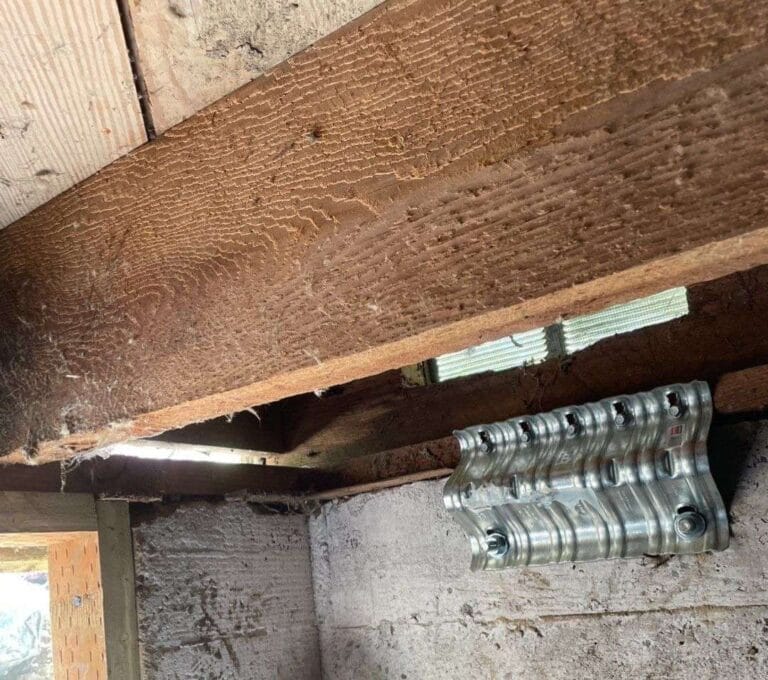
Step 6: Reinforce the Structure
In many cases, restoring the crawl space’s structural integrity may require more than removing and replacing damaged wood. Reinforcing the area ensures your home remains safe and stable for years.
Standard reinforcement methods include sistering and bracketing. Sistering involves attaching a new piece of wood alongside the compromised one to provide additional support. Steel brackets or plates can also help strengthen weak areas, particularly in load-bearing sections.
When reinforcing your crawl space, prioritize quality materials and precise installation. Professional assistance can be invaluable, as improper reinforcement can lead to further complications.
Step 7: Encapsulation
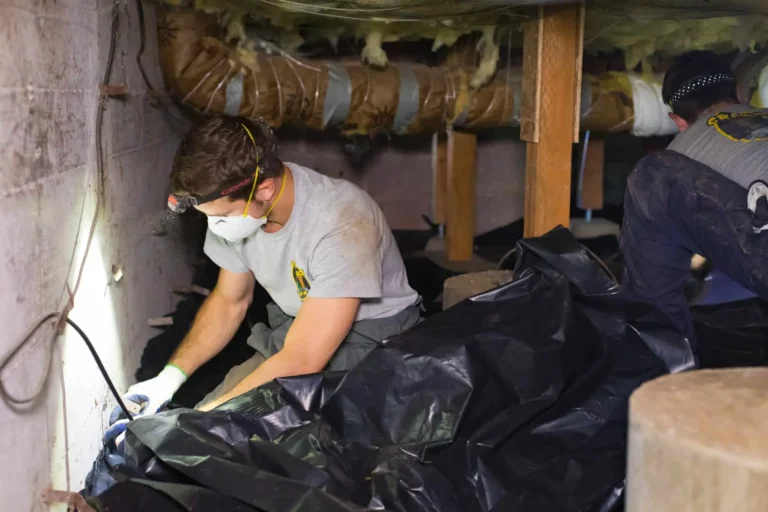
Encapsulation is one of the most effective ways to protect your crawl space from moisture and prevent future dry rot. This process involves sealing the entire crawl space with a heavy-duty vapor barrier and insulation, creating a controlled environment.
Encapsulation starts with thoroughly cleaning the crawl space and installing a plastic barrier over the floor and walls. The sealed seams ensure no moisture can seep through. Additional measures, such as dehumidifiers or sump pumps, can be added for maximum protection.
While encapsulation may seem like a significant investment, it provides long-term peace of mind by safeguarding your crawl space from moisture-related issues.
Step 7: Encapsulation
Encapsulation is one of the most effective ways to protect your crawl space from moisture and prevent future dry rot. This process involves sealing the entire crawl space with a heavy-duty vapor barrier and insulation, creating a controlled environment.
Encapsulation starts with thoroughly cleaning the crawl space, followed by installing a plastic barrier over the floor and walls. The sealed seams ensure no moisture can seep through. Additional measures, such as dehumidifiers or sump pumps, can be added for maximum protection.
While encapsulation may seem like a significant investment, it provides long-term peace of mind by safeguarding your crawl space from moisture-related issues.
Step 8: Ongoing Maintenance
Dry rot remediation continues after repairs. Maintenance is critical to ensuring your crawl space remains dry and fungal growth-free. Regular crawl inspections can help catch potential issues early, saving you money in the long run.
Create a maintenance schedule, which may include checking for leaks, monitoring humidity levels, and inspecting the condition of wood and insulation. Ensure your drainage systems are functioning correctly and clear any debris blocking ventilation.
Consistent proactivity can prevent minor issues from escalating into costly problems and keep your crawl space in optimal condition.
Preventing Future Dry Rot
While addressing existing dry rot is essential, prevention is equally important. Here are some strategies to protect your crawl space:
- Seal Cracks and Leaks: Regularly inspect and seal openings that could allow moisture to enter.
- Install Treated Wood: Use pressure-treated wood for crawl space construction to resist fungal decay.
- Maintain Drainage Systems: Ensure gutters, downspouts, and foundation drainage systems work correctly.
- Invest in Annual Inspections: Professional inspections can catch problems before they become serious.
Conclusion
Dry rot is a silent but destructive force. If left unchecked, your home’s structural integrity could become compromised. Recognizing the signs—such as discolored or brittle wood, fungal growth, musty odors, and cuboidal cracking—is the first step to protecting your crawl space. Understanding the causes, including excess moisture, poor ventilation, and contact with damp soil, empowers you to address the issue effectively.
If you discover dry rot, prompt action is essential. Begin by eliminating moisture sources, improving ventilation, and removing and replacing any damaged wood. Treating the remaining wood with fungicide, reinforcing the structure, and encapsulating your crawl space are all vital steps to restore and safeguard this critical area of your home. Prevention is equally essential: maintain proper drainage, use treated wood, and schedule regular inspections to catch problems early.
By proactively approaching dry rot prevention and remediation, you can ensure your crawl space remains dry, safe, and structurally sound. At Your Crawl Space Guys, we specialize in identifying and resolving crawl space issues with tailored solutions for every homeowner. Don’t wait until dry rot becomes a costly problem—contact us today for expert assistance in protecting your home from this pervasive threat.